Getting Started with JavaCC
22 August 2014 Recently, I wanted to write my own parser for a hobby project. I chose to use JavaCC, because it seems to be one of the more accessible Parser Generators. In my journey I did find, however, that there is a lack of a gentle introduction into JavaCC. The articles I found were very high level and theoretical, or they always solved the same problems (basic arithmetic expressions). I plan on writing a couple of articles that are very hands on, very practical. This first article will be a quick getting started guide aimed to get you up and running quickly. The next paragraph will describe from a theoretical perspective what JavaCC is and why one would want to use a parser generator. In "Creating a workspace" I will show you how to get the hello world project up and running in a minute or so. Then I will discuss the demo project for JavaCC in depth. It is a good starting point for creating a parser.JavaCC
JavaCC is named the Java Compiler Compiler. It is an open source parser generator. You can use it to create your own custom parser. A parser is a program which uses validates an input file against a grammar. It reads a file in one format and (if valid) converts it to another format, usually executable code. We typically create parsers when we are creating our own programming language. Sometimes we create them for templating languages or for tokenizing raw text. Creating parsers by hand is error prone and parser generators offer a higher level syntax to aid process. For simple text manipulation one would use String manipulation libraries, for moderately complex problems regex is enough. Using JavaCC for such problems is overkill and will cause mor e problems than is solves. When things get complex, however, having a parser generator at your disposal is a life saver. One of the features of JavaCC that I really like, is that the generated parser has no dependency on javacc. In other words, javacc creates pure java source files that can run without any external dependencies. Antlr in comparison requires the antlr jar to be present at run time. My focus here is practical, so this is the only theory on the matter I will be discussing here. I am not going to discuss concepts such as LL(1) grammars or recursive descent parsing. I do recommend acquainting oneself with the theory behind parsing, when working with parser generators.Creating a workspace
In this section we will create a basic JavaCC project in a few minutes, so you can start learning quickly. Create a new java project in an eclipse workspace. You can delete the src folder created by Eclipse, we will use our own source folders. Create a folder in the root of the workspace named demo. Download the following archive and unpack it in the demo folder: Download demo.zip The archive contains all the files discussed in this article and takes setting up JavaCC out of your hands. Refresh the root of the project so that eclipse sees the files. Open the ant view in eclipse through the menu `window > show view > ant` or keyboard `ctrl + 3 > ant > Enter`. Find demo/build.xml in the package explorer and drag it to the ant view you just opened. It should look something like this: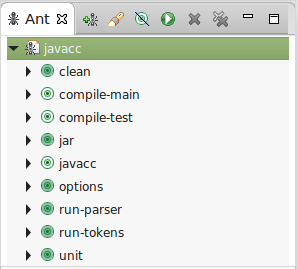 And you're good to go. Simply double click run-parser to run the parser or unit to run the unit tests.
You probably want to compile the java sources in eclipse as well for tooling support.
In the package explorer find the folders demo/src/main/java and demo/src/test/java.
Select the folders one by one using the right mouse button and select `Build Path > Use as Source Folder` for each.
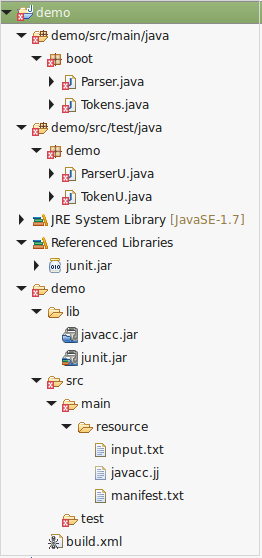
If all goes well, they will move to the root of the package explorer with a package symbol inside a folder.
Similarly, for demo/lib/junit.jar select `Build Path > Add to Build Path`.
This adds junit to the build path and ensures the junit tests compile.
Your project should look like this now:
And you're good to go. Simply double click run-parser to run the parser or unit to run the unit tests.
You probably want to compile the java sources in eclipse as well for tooling support.
In the package explorer find the folders demo/src/main/java and demo/src/test/java.
Select the folders one by one using the right mouse button and select `Build Path > Use as Source Folder` for each.
If all goes well, they will move to the root of the package explorer with a package symbol inside a folder.
Similarly, for demo/lib/junit.jar select `Build Path > Add to Build Path`.
This adds junit to the build path and ensures the junit tests compile.
Your project should look like this now:
 The files will not compile unless you run the javacc target and refresh the workspace.
This is because a the java files depend on the parser and it hasn't been generated yet.
JavaCC creates code that will give warnings in Eclipse. That is perfectly normal.
There is a javacc plugin for Eclipse, but I've never tried it.
The files will not compile unless you run the javacc target and refresh the workspace.
This is because a the java files depend on the parser and it hasn't been generated yet.
JavaCC creates code that will give warnings in Eclipse. That is perfectly normal.
There is a javacc plugin for Eclipse, but I've never tried it.
Project Files
In this section I will create a simple file structure for our hello world JavaCC project. In the next section, I will create a build file for compiling, running and testing the parser. Lastly, we will examine the source files and generated results. Here is a picture of the folder structure in the sample project: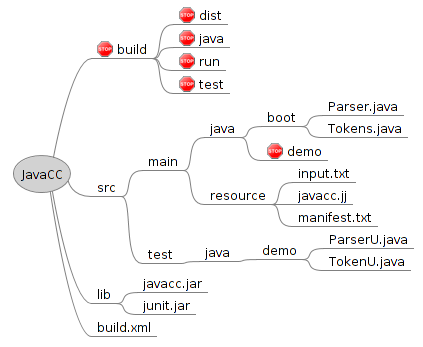 In the root of the project you can see the ant build.xml file, which is used to build the project.
The demo uses two jar files found in the lib directory
1) javacc.jar for creating the parser
2) junit.jar for running the unit tests
Other than that the project uses only core java, feel free to add your own jars to the lib dir.
They will automatically be picked up by the build file.
In the root of the project you can see the ant build.xml file, which is used to build the project.
The demo uses two jar files found in the lib directory
1) javacc.jar for creating the parser
2) junit.jar for running the unit tests
Other than that the project uses only core java, feel free to add your own jars to the lib dir.
They will automatically be picked up by the build file.
The sources are in a mavenlike folder structure, where main is used for application code and test for unit tests. The boot package contains files with a main method, which will be invoked from the build file for running the demo. The demo package will be filled by JavaCC with the parser generated from the grammar file (javacc.jj). I have used a stop sign to indicate directories that should not be modified, because they are generated. In the resource dir we see the grammar file javacc.jj, which will be examined later, input.txt contains the input which will be parsed by the parser for demonstrating the parser in action. manifest.txt contains the manifest file added when creating a jar file for the parser. It is empty for now, but you could specify manifest entries here if you wanted to. Lastly, the build directory will contain any artifacts generated by the build file. The jar file will be created in the dist directory.
Ant Build File (build.xml)
The build file contains 4 main targets: clean, run-tokens, run-parser and unit.clean deletes all generated resources; deletes the build directory and the demo package. run-tokens runs lexical analysis only and prints out all generated tokens. run-parser runs the parser (lexical analysis is done implicitly). unit runs the unit tests. Any java classes in the test directory whose names end with a capital 'U' are executed. There is a external target that creates a jar file for the parser. This way, one can create the parser and attach it to another project as a separate jar file. I recommend this approach, because JavaCC generated code generates a lot of warnings. These warnings might obfuscate problems in your own sources if not placed in a separate jar. Lastly, I the options target dumps all configuration options for the javacc parser on the command line. These can be set on the command line or in the grammar file (next section). Options set on the command line will override those in the grammar file. See also: https://javacc.java.net/doc/javaccgrm.html
The build file also has a few internal targets, which you might never call directly: javacc, compile-main, compile-test. Note that when compiling with JavaCC, compilation is a 2-step process. First JavaCC creates the parser from the grammar file. The parser is generated as java source files. Java source files need to be compiled before they can be executed, thus the second step. In the build file target javacc generates the parser, target compile-main compiles the parser, lastly compile-test compiles the unit tests. These targets are called implicitly through dependencies where needed.
The Grammar File
Now that we have discussed the build file, lets move on to JavaCC itself. Every JavaCC project has a grammar file which describes valid input. The grammar format defines the tokens used, the parser rules and can even be used to specify code that has to be executed while parsing. Let us take a look at the first 15 lines of the grammar file first: javacc.jj [1:15]options {
STATIC = false;
}
PARSER_BEGIN(DemoParser)
package demo;
import java.util.List;
import java.util.ArrayList;
public class DemoParser {
}
PARSER_END(DemoParser)
The beginning of the grammar file declares the parser.
You can specify options at the start of the file, and as you can see, I set the static option to false.
By default JavaCC is static, meaning there is only one parser for the JVM, which is a dangerous assumption to make.
Between the PARSER_BEGIN and PARSER_END we see an empty parser class declaration that will be filled by JavaCC. You will see java code here, because the java code is copied to the java source file for the parser literally. Specify the name of the parser class to generate inside the parentheses. The name you specify here is the name of the class you will be invoking from your application. Also, it is used as the base name for two other classes: [base]Constants and [base]TokenManager. I will discuss the generated classes in the next section, this section is focused solely on the grammar file.
Note that when JavaCC creates the parser it is created in the directory you specify. JavaCC does not place the generated parser in a subdirectory matching the package declaration. In other words, if you change the package here, you will need to modify the destination directory in the build file as well. If you forget to do this, the java compiler will complain that the declared package does not match the expected package. If the parser uses classes that require imports, then add them here. I imported java.util.List and ArrayList. We will see why I need those imports later. A minimal parser declaration would have no package declaration, no imports, no options configured, but it will normally contain at least the above.
If you desire so, you can add a main method or other custom methods as well. I avoid this, because if I put these in a separate file, I will have IDE support when coding. The next section of the grammar file is used for lexical analysis: javacc.jj [20:26]
SKIP: {
    " " | "\t" | "\r" | "\n"
}

TOKEN : {
	<NAME: (["a"-"z", "A"-"Z"])+>
}
The first few lines indicate skip characters. Typically whitespaces and newline characters are skip characters.
We don't want the parser to fail when we encounter a new line, but we also don't have any use for them in the parser.
Skip characters will not be passed onto the parser (unless they occur somewhere as part of a token).
Note that the parser is still aware of the line number even when carriage returns are skipped.
Next we define the token "NAME", which consists of one or more letters lower or upper case. This is the name we are going to use for our hello world application. Tokens and lexical analysis will be explored in the next installment of this series. Finally, we add a single parser rule to our grammar file: javacc.jj [30:38]
List<String> parseFile() :
	{
		Token token;
		List<String> names = new ArrayList<String>();
	}
	{
		( token=<NAME>{ names.add(token.toString()); } )*
		<EOF> { return names; }
	}
A parser rule starts with the (partial) definition of a method. A method with this name will be added to the created parser.
In this case the method is called parseFile and it returns a List of Strings.
Between the first two curly braces there are two lines of code that are executed before processing the tokens. If your parser does nothing but validate the input, then these first two curly braces will typically be empty, but are still required. We declare a token variable and an empty ArrayList named "names" (remember the imports of List and ArrayList at the top of the file?).
The next two curly braces specify the parser rule. This rule expects zero or more NAME tokens end then the EOF (end of file) token. When a name token is encountered it is assigned to the "t" variable and a String representation of this token is added to names. When we finally encounter the EOF token, we return the list of names we found. I plan on discussing the parser rules in the third installment of this series.
The Generated Parser
If we run the javacc target in the build file, then it will create the following 7 java source files of the parser:- DemoParser
- DemoParserConstants
- DemoParserTokenManager
- ParseException
- SimpleCharStream
- Token
- TokenMgrError
new DemoParser(new BufferedInputStream(new FileInputStream(new File(args[0]))));The easiest way to parse a raw String:
new DemoParser(new StringReader("parse me"));
After we create the parser, we can either read the tokens one by one, or we can invoke one of the parser rules.
If we are only interested in lexical analysis (or are debugging) we will call the getNextToken() method.
It returns a single token and can be called repeatedly.
new DemoParser(new StringReader("parse me")).getNextToken();
This would return a Token object for the NAME "parse".
In the section above I mentioned that the first line of a parser rule is a partial method signature.
I named the parser rule for the demo project parseFile() in the section above.
We can invoke this rule by calling parseFile() on the created parser object:
new DemoParser(new StringReader("parse me")).parseFile();
This method will return the ArrayList => ["parse", "me"] as discussed.
The Token class is one you will be seeing and using a lot, mainly in the grammar file.
The most important attributes of the Token class are:
- String image
- int kind
- int beginLine
- int endLine
( token=<NAME>{ names.add(token.toString()); } )*
kind contains an integer representation of the kind of Token. This number could change if the grammar changes.
DemoParserConstants is a utility class that can be used to make sense of these numbers.
It contains a String[] where the String at the index of kind, contains a String representation of the Token type.
So, lets say we have a Token of type NAME, then the following code would return "<NAME>".
DemoParserConstants.tokenImage[token.kind];It also contains a constant for every kind of Token, which can be used check if a Token is a particular type. In the demo grammar file, there is only one Token type (NAME), so there are only two constants:
int NAME = 1;And the EOF Token type:
int EOF = 0;The beginLine and endLine attributes specify the starting and ending line of the Token in the original source. Note that a Token can span multiple lines depending on how it is defined in the grammar. There are also similar constants for the column number. These constants are useful when we need to generate error messages.
The parser itself throws two types of Throwables depending on the type of problem that is encountered. It will throw a TokenMgrError if lexical analysis fails. This is a java.lang.Error subclass. It will throw a ParseException if parsing fails. This is a java.lang.Exception subclass. In my experience, if parsing fails by either one of these, I need to abort the operation. Why one of them is a checked Exception and the other an Error is beyond me? I have found with unit tests, that as the grammar file changes, the type of Throwable thrown may mutate. When invoking the parser I suggest catching both and throwing a custom runtime or checked exception. This way, the interface is a little easier to use. It is also possible to use a catch all token, which will turn all TokenMgrErrors into ParseExceptions. I might discuss this approach in the next installment of this series. Of course, the challenges you face may be different and JavaCC's default may actually make sense for you. DemoParserTokenManager is the lexer. I will be adding code to the lexer in the next installment of this tutorial. I have never needed to look at SimpleCharStream, so will ignore it for this tutorial. I will give examples of using the parser in the section below.
Lexical Analysis
In this section I will show a trivial example of invoking the lexer: Tokens.java [15:22] public static void main(String[] args) throws FileNotFoundException {
DemoParser parser = new DemoParser(new FileInputStream(new File(args[0])));
for (Token token : tokenize(parser)) {
String name = DemoParserConstants.tokenImage[token.kind];
System.out.println(token.beginLine + ":" + name + " => " + token.image);
}
}
The main method creates a DemoParser from a FileInputStream which reads the input file.
The parser is fed to the tokenize method which returns a Collection of Token objects for the input.
The main method iterates over the tokens and prints the line number and Token type and raw token (original characters in input).
Rather than printing the Token.kind field, which would return a number,
here we can see the usage of the DemoParserConstants.tokenImage array to turn them into human readable token representations.
The resulting output will look something like this:
1:<NAME> => ErikThe main method prints all Tokens found in the input. Useful for debugging small input files. There are other ways to do this though. For example setting the DEBUG_TOKEN_MANAGER option to true, or using a COMMON_TOKEN_ACTION (not discussed here). If lexical analysis fails, it will throw a TokenMsgError. For our demo grammar this will happen as soon as a non-alphabetic, non-whitespace character is encountered. Tokens.java [24:34]
	public static List<Token> tokenize(DemoParser parser) throws FileNotFoundException {
		List<Token> tokens = new ArrayList<>();

		Token token = parser.getNextToken();
		while (token.kind != DemoParserConstants.EOF) {
			tokens.add(token);
			token = parser.getNextToken();
		}
		return tokens;
	}
}
In the tokenize() utility method you can see me iterate over the tokens until I reach the EOF token.
Here we can clearly see the usage of the DemoParserConstants to examine the type of the token.
The Token objects are simply added to an ArrayList and the List is returned.
Parsing
In this section I will show a trivial example of invoking the parser: Parser.java [13:20] public static void main(String[] args) throws ParseException, FileNotFoundException {
FileInputStream is = new FileInputStream(new File(args[0]));
DemoParser parser = new DemoParser(new BufferedInputStream(is));
for (String name : parser.parseFile()) {
System.out.println("Hello " + name + "!");
}
}
Once again we create a DemoParser from a FileInputStream.
The parseFile() method we defined in the grammar file reads the tokens and adds them to a List.
So, we can simply iterate the names and print them, no need to use Token Objects.
Unit Testing
In this section I will demonstrate how we can write unit tests for lexing and parsing. I created a utility method for hassle free invocation of the Tokens.tokenize() method. TokenU.java [30:36] public static List<Token> tokenize(String raw) {
try {
return Tokens.tokenize(new DemoParser(new StringReader(raw)));
} catch (FileNotFoundException e) {
throw new RuntimeException(e);
}
}
This method takes an input String as argument, creates a Reader for it and returns the Tokens from lexical analysis.
Next we create a unit test:
TokenU.java
[16:23]
	@Test
	public void tokenize() {
		Iterator<Token> iter = tokenize("JavaCC Demo").iterator();

		Assert.assertEquals("JavaCC", iter.next().image);
		Assert.assertEquals("Demo", iter.next().image);
		Assert.assertFalse(iter.hasNext());
	}
This test simply creates tokens for a String and verifies that it contains two names and nothing more.
TokenU.java
[25:28]
	@Test(expected=TokenMgrError.class)
	public void tokenizeError() {
		tokenize(" * ");
	}
This additional test verifies that lexical analysis fails if an invalid character is found in the input.
The @Test annotation has been configured to expect a TokenMsgError.
The parser can be tested in a similar fashion:
ParserU.java
[13:21]
	@Test
	public void parse() throws ParseException, FileNotFoundException{
		DemoParser template = new DemoParser(new StringReader("JavaCC Demo"));

		Iterator<String> iter = template.parseFile().iterator();
		Assert.assertEquals("JavaCC", iter.next());
		Assert.assertEquals("Demo", iter.next());
		Assert.assertFalse(iter.hasNext());
	}
All tests can be run using the "unit" target in the Ant build file.
Resources
https://javacc.java.net/http://www.engr.mun.ca/~theo/JavaCC-FAQ
http://www.engr.mun.ca/~theo/JavaCC-Tutorial
Next: Lexical Analysis Main Page